Saturday, December 28, 2019

Fix Outlook Error 0x800ccc0e by Easy Methods

While sending or receiving outlook emails, users can experience Outlook Error 0x800ccc0e.  This error code can prevent users to send or receive outlook emails. There are a lot of causes due to which this error code can take place. This is extremely confused situation for the users and therefore there is a necessity for an immediate solution for this error code. Here, we discuss the main reasons of this error code and easy methods to fix this error code appropriately.
Main reasons of outlook 0x800ccc0e
  1. The email settings of your Outlook account might be incorrect.
  2. The wrong connection of Internet service provider.
  3. The sudden crash of the computer system.
  4. Obstruction of antivirus software with Outlook operations.
  5. The outlook PST files are completely corrupted.
  6. The enabled add-ins causes issues.
Easy methods to fix outlook 0x800ccc0e error code
Method 1-Confirm Outlook email settings
Step1- Start MS outlook, navigate to Tools button and go to account settings.
https://www.microsoftoutlookoffice.com/blog/how-to-resolve-outlook-error-0x800ccc0e/

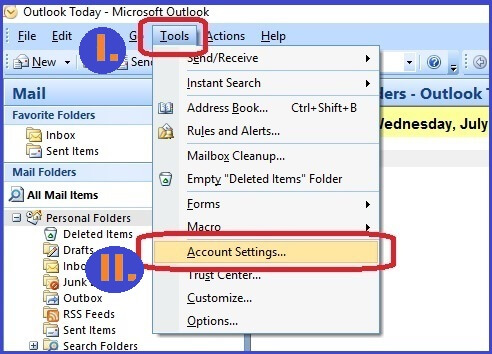
Step2- Press on “email” button and select email accounts.
http://www.how2repairoutlookpst.com/blog/wp-content/uploads/2018/12/0x800CCC0E-2.jpg

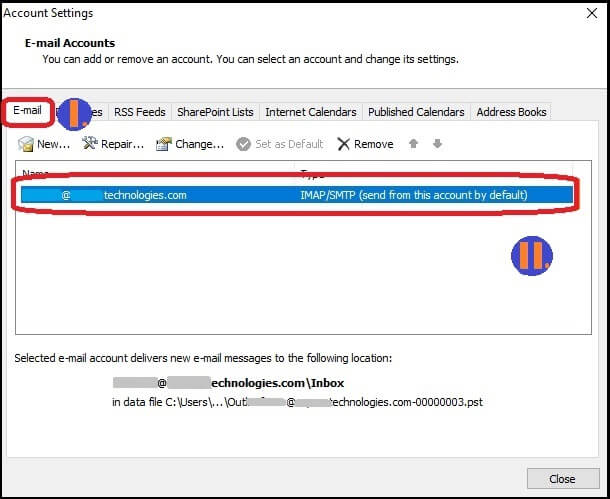
Step3-On windows of change email account appears. Next, click on “more settings” button. Go for next step for outlook 0x800ccc0e.
http://www.how2repairoutlookpst.com/blog/wp-content/uploads/2018/12/0x800CCC0E-3.jpg

Step4-Next, the window of email settings is opened freely and click on “outgoing server button” and select my outgoing server needs verification box and click on “Ok” button.

http://www.how2repairoutlookpst.com/blog/wp-content/uploads/2018/12/0x800CCC0E-4.jpg
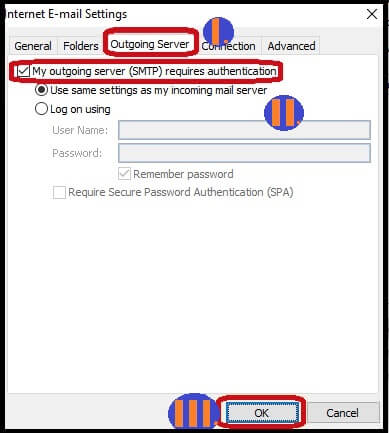
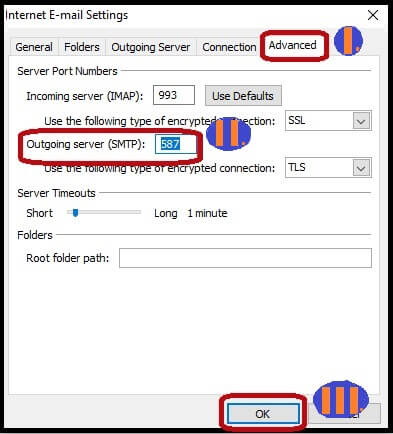
Step5-Under the Internet email setting section, make the navigation to the advanced button. Adjust outlook server port number to 587 and then click on “ok” option to apply the changes.
https://www.microsoftoutlookoffice.com/blog/how-to-resolve-outlook-error-0x800ccc0e/

Method 2-Run MS Outlook application in the safe mode
  • Click on Windows +R key
  • Enter outlook/safe in the opening box and click on “Enter” button
Method3- Deactivate Antivirus program on the computer system
There are the chances that the installed antivirus program creates difficulties in send/receive operations of MS outlook. Due to that, this error code can take place. So, you can disable the antivirus program while applying the send/receive operations.
Method4-Deactivate the add-ins
You can deactivate the outlook add-ins.  The users can create issues with working operation of MS outlook. Deactivate the add-ins not including from the default add-ins.
Method5-Repair PST File
Often, the PST files of MS outlook are found fully damaged or corrupted. So, it needs to be resolved immediately. You can repair PST file along with the aid of inbox repair utility scanpst.exe. If there is harsh corruption, you can attempt the automated solution PST repair tool.
With the help of all these above instructions, you can resolve Outlook Error 0x800ccc0e properly. Still, if you’re facing this error code, you can call online technical support team.

Thursday, December 26, 2019

How to Obtain the Recovery of Deleted Files Windows 10?

Generally, when a file is removed in windows, it directly moves to the Recycle Bin folder, if not, you’ve customized or pinched the recycle bin properties. In the case, if you’ve deleted a folder or file in the windows 10 wrongly, they can keep restoring the removed folder or file from the Recycle Bin within a few clicks. Even though, if you’ve used a Shift+Delete key to delete a file, you will need either data recovery software or a backup to obtain the removed data back. 
https://www.microsoftoutlookoffice.com/blog/essential-steps-to-recover-deleted-files-windows-10/

How to recover deleted files windows 10? Let us explain in the detail.
Here, we’re going to discuss how to recover mistakenly deleted files like documents, emails, photos, videos, and audio files in windows 10. We’re going to share some easy troubleshooting steps to Recover Deleted Files Windows 10.
Easy Steps to recover removed files from windows 10
Step1- Stop using the drive or system
After files are eliminated from a computer system, it is very serious point to prevent using the storage drive or system to stop the data overwriting.
 Step2-See in Recycle Bin
https://www.microsoftoutlookoffice.com/blog/essential-steps-to-recover-deleted-files-windows-10/

Step1- Go to Desktop icon and open “Recycle Bin” folder option
Step2- Find out the removed file in this folder
Step3-Make right-click on the folder or file, and choose, “Restore” option.
Step4- Then, the file or folder get restored to its previous location.
https://www.microsoftoutlookoffice.com/blog/essential-steps-to-recover-deleted-files-windows-10/

It is very necessary for users to change the recycle bin properties as displayed in the screenshot to stop deleting files permanently without verification.
Step3-Keep Restored from an older backup system
https://www.microsoftoutlookoffice.com/blog/essential-steps-to-recover-deleted-files-windows-10/

 If you follow the best procedures for data security, it will be safe for you, if you take a backup. With the help of backup process, you can get remedy solutions on How to Recover Deleted Files Windows 10. Even though, if the backup is not available or is outdated, you should obtain reliable data recovery software.

Step4- Use a Data Recovery Tool in Proper ways
After taking backup procedure, a data recovery software is the most powerful tool of recovering lost and wrongly removed files in windows. This software is available with the latest recovery features and advanced utilities. It helps users to recover lost data from different locations and protect against future data loss. Thus, you can get solutions for how to Recover Deleted Files in Windows 10 easily.
With the help of all these steps, you can recover removed files windows 10 easily. Still, if you have any issues, you can get connected with live technicians to get quick support.

Tuesday, December 10, 2019

Easy Instructions to Change Hotmail Account Password

Today, Hotmail is highly recognized by the name of Microsoft outlook as its name has been altered. It is extremely simple to create a fresh account on Hotmail but varying Hotmail password is extremely tough task that’s numerous users ask that how to Change Hotmail Password. If you want to change your hotmail password, you must follow some important instructions suggested by the experts. Our technical experts will guide you step by step for Change Microsoft Password immediately. Let us apply the easy instructions to change Hotmail account password.
https://www.microsoftoutlookoffice.com/hotmail-password-reset

Easy and smart instructions to change Hotmail Password
Step1- In the search option, you need to enter Hotmail login and after that, you need to click on outlook.com, Microsoft free personal email linkage.
Step2- Open Outlook or Hotmail sign in window, click on “Sign in “option.
Step3- Then, Hotmail sign in page will open completely. On that page, you have to type email ID and password and click on “Sign in “option.
Step4- Outlook or Hotmail home page will obtain from there button on the upper side right corner button. On hitting that will display from there choose “view account link” button.
Online Technicians are available 24/7 to Guide You Properly
Step5- Then, you should open your profile from that location click on “more action” button and then hit on “change password link” option.
Step6- Then, you have to enter the present password and click on “next” option. Go for next step for change Hotmail password.
Step7- After that, you need to authenticate your identity.  For it, click on “send code” button and then, you need to type the code which you’ve obtained on your phone number or email.
Step8- After the verification of your account, you should type your present password, fresh password and click on “confirm” button.
Step9- At last, you should click on “next” option and an email will be delivered verifying the change of your password that indicates that your password has varied successfully.
With the help of all these above steps, you can Hotmail Change Password successfully. These instructions are very helpful for changing the Hotmail account password. Still, if you have any kind of technical troubles, you can call online technical support professionals.

Thursday, December 5, 2019

How to Change from Outlook Working Offline to Online?

How do you clarify that your MS outlook connection while it is in online or offline mode?  In the foot of Outlook windows, you will observe either “working offline” or “disconnected” on the status bar which indicates that you should know that Outlook Working Offline message. When you’re working with MS outlook in offline mode, you will not able to send or receive email. If you’re experiencing outlook offline issue continuously, you should follow the instructions suggested by the expert technicians.
https://www.microsoftoutlookoffice.com/blog/how-to-convert-from-outlook-working-offline-to-online/

Easy Methods to change from Outlook working offline to Online
Method 1- On Windows
  • First of all, you should open your MS outlook just by giving double-click on the outlook app button, which shows like a white “o” on a dark-blue box button
  • Secondly, make sure that your MS outlook is presently offline. There are a lot of indications that shows your MS outlook is presently in “work offline” mode
  • A “working offline” menu will show up in the lower-right corner of the MS outlook window
  • A white “X” on a red menu will show up on the MS outlook app menu in the task bar
  • When you’re verified that your MS outlook is working in offline mode, you need to bring it immediately online by clicking on the send/receive button. This icon is available in the blue banner at the upper side of the Outlook window.
  • Now, you must go to right corner of the send/receive taskbar and ensure that “work offline” option is active. If it correct and option is active, the background of the option will be dark-grey. If background of the menu is not dark-grey, then “work-offline” option is not enabled.
  • You have to click on “work offline” option that is placed in the right side of the toolbar. If the option was not active, click on “work offline” for active one time and second time click on disable it.
  • Wait for a few minutes, you can disappear the “working offline” message. When this mark doesn’t appear from the bottom right corner of the window, MS outlook informs that working online.
  • Finally, you may enable and disable “work offline” feature again before “work offline” option will turn off. With the help of these steps, you can bring offline to online mode in the easy ways.
Method 2- On Mac
For Mac Users, they are strongly recommended to follow the below provided steps carefully and suitably, if outlook 2016 working offline is occurring. Here are some technical instructions to sort out this issue.
  • Initially, make a double-click on the MS outlook app menu which resembles a white “O” on a dark-blue menu to open this application on your Mac operating gadget
  • Next, tap on “Outlook” from the menu bar at the upper side of the display. It opens a drop-down menu appropriately.
  • From the given list, pick up the button “work offline” and tap on it correctly. You will search it in the third menu. When MS outlook is in offline mode, you will observe a checkmark icon to “work offline” option in the main drop-down menu.
  • To disable Outlook Offline mode, check carefully that there is no indication of checkmark next to “work offline” button in the main MS outlook drop-down menu.
https://www.microsoftoutlookoffice.com/blog/how-to-convert-from-outlook-working-offline-to-online/

With the aid of these described instructions, you can fix Outlook 2016 working offline issue easily. Still, if you’re facing any issues, you can get connected with outlook technicians to get instant support or help.


Monday, December 2, 2019

How To Get Rid Of Outlook Keeps Asking For Password Office 365?

MS outlook is the most extensively used email application globally, which is mainly used by millions of users. While using it, some users face issues, or some do not experience any issues. Some issues are easier to resolve than others, and some issues are difficult than others. Outlook keeps asking for password office 365 is one of them. You can come across such a technical glitch where MS outlook steadily prompts you for your password to connect to MS office 365. But when you attempt to cancel the prompt, you get the following error message- the connection to MS exchange is unavailable. MS Outlook needs to keep online or linked to complete this action.
This password prompt problem may be caused if your logon network safety is lay down to any worth other than Anonymous Authentication. Fortunately, this issue is very simple to resolve and is only worrying and not dangerous to your computer system. Let us see the explanation of office 365 keeps asking for password with effective solutions.
Easy Ways to Fix Outlook keeps asking for password-
Here, we will explain you to fix password prompt error in office 365 correctly. For resolving Outlook keeps asking for password, you have to go into the Microsoft exchange settings and security.
Step1- You should open the control panel. In the windows 7, 8 & 10, you can type the control panel into the start button and choose it from the results.
Step2- Find out mail and make double-click to open it rightly
Step3- You have to click where it informs show profiles, pick up the outlook profile that you need to check out and after that, you have to click on “properties” button.


https://www.microsoftoutlookoffice.com/blog/outlook-keeps-asking-for-password/


Step4- Click on “email accounts” to open account settings and under section of e-mail menu, click on “change” option. For Office 365 keeps asking for password, you can go for next step.


https://www.microsoftoutlookoffice.com/blog/outlook-keeps-asking-for-password/


Step5- Click on “more settings” under the change account box
Step6- Make navigation to safety tab in the MS exchange window


https://www.microsoftoutlookoffice.com/blog/outlook-keeps-asking-for-password/


Step7- From the login network security dropdown option and pick up
Anonymous Authentication and click on “Apply” button and press on “OK “option
Step8- Come back into the change account window section, press on “next” option and click on “finish” button. Thus, you can fix outlook keeps asking password problem effortlessly.
With the help of all these above instructions, you can fix Office 365 Keeps Asking For Password problem easily. Your password prompt issue for outlook in office 365 can be resolved easily. Still, if you’re facing any other issues, you can call online technical support experts sitting round the clock to help you immediately.